The Project:

Since June 2008 I have been riding a Giant TCR Alliance. Over the years I have swapped out many parts, and the bike is becoming like George Washington's axe. New handle, new head but still the same axe. How long will a composite frame last, with the carbon-alloy joins? Since I have been happily replacing parts as they wear out, the obvious question is this: instead of buying a new bike assembled, how much would it cost to buy a new bike piece by piece? Only one way to find out...

Friday, December 21, 2012

Get Set for a Head Rush - The Headset

Get Set for a Head Rush - The Headset 

Most things that turn have to be held in place, otherwise they can fall over.  Car axles turn, but have to be held secure.  On bikes, the turning parts that must be held in place include the crank, hubs and the steering tube of the forks.

The crank is secured by the bottom bracket, which, with the Shimano Hollowtech system used on my build, has two sets of enclosed bearings threaded onto each end of the bottom bracket, and the crank shaft (aka spindle) passes through each bearing ring.

Leaving aside the hubs, which are self-contained units held in place with a pair of quick-release skewers, a direct analogue of the bottom bracket is the headset.

The front wheel, held in place in the forks with the quick-release skewer, must be able to turn if the bike is to change direction.  The fork steering tube passes up through the head tube of the frame, to have the handlebar stem bolted on to the top of the steering tube.

Securing the steering tube within the head tube, so that it can turn smoothly and spread the load, requires what is known as the headset, and which has a similar structure to the Hollowtech bottom bracket, but with some differences.

The early headsets are what is known as threaded, and these are still used on many bikes, owing to their tough design.  The bearings are held in place by ring-shaped cups that are threaded onto each end of the head tube.  

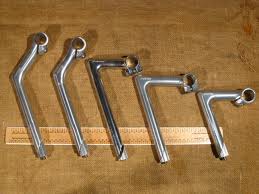
The threaded rings hold the bearings secure - the steering tube just fits snugly down the centre of the bearing cups. Road bikes moved away from threaded headset when design shifted from one-piece quill stems, which were inserted into the top of the steering tube and secured with a an oblique anchor nut, and began to use the modern system of a stem that bolted directly onto the steering tube.

Introduced in the 1990's are the threadless headsets.
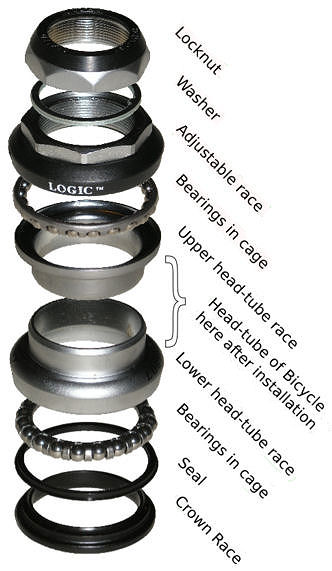
The bearings are contained in enclosed cups that are pressed in to each end of the head tube.  A defining feature of the threadless headset is the star-fangled anchor nut.  Above the head tube are spacer rings that are used to set the height of the stem, and the bolt-on stem.

  The top edge of the stem must stand slightly above the top of the steering tube, and the top cap secures the anchor bolt. Tightening the anchor bolt through the star nut screws the top cap down onto the stem, essentially drawing the steering tube up towards the top cap.  This provides the tension that holds the headset-bearing-steering tube system in place.
Threadless headset. Note the external bearing cups.

Of note is the importance of not tightening the stem bolts until the headset is correctly tensioned, otherwise the only achievement will be to strip the star bolt, and to have a loose, rattly headset with dodgy steering.

Common on road bikes are integrated headsets. Similar in design to the threadless system, the bearing cups of the integrated system are recessed into the head tube, which must now provide lateral support for the bearings.  Recessing the bearings removes them from sight, giving the clean visual transition from the forks straight to the head tube, with no visible bearing cups.
Integrated headset.

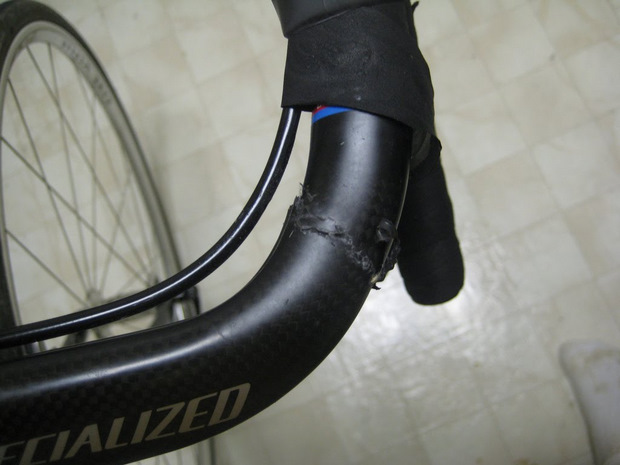
Some manufacturers, notably Chris King, are critical of the integrated headsets, owing to the greater stress placed on the head tube itself, with the associated greater risk of structural damage to the head tube.  Metal head tubes can be repaired with some skill with a TIG welder, but for many carbon frames such damage can result in total frame replacement.  This is in contrast with a regular threadless headset, where the bearing cups are outside the base of the head tube, thereby eliminating the likelihood of irrepairable damage.

For mountain bikes, which experience a much greater degree and frequency of forward compression impacts on the steering column, integrated can be a very bad idea.  For road bikes, a well-made head tube can support a matched headset.  And that is the main issue - that the headset bearing cups match the head tube.

My current ride has seen many thousands of kilometres over the last 4.5 years, and the internal headset is a little worn, with some notchiness creeping in, but it rolls nicely and there is no damage to the alloy head tube, so the big conclusion that I can draw from this is that for a road bike ridden where, how, and as frequently as I do, an integrated headset will do quite nicely.

Which is just as well, as there are not many semi-integrated headset available, which are the fourth kind of head set available.  The bearings are recessed as with an integrated headset, but are supported by a press-fit race.

There are many headsets available, of a range of weights from (about) 50 gm up to 200 gm, depending on the metal used and the size of the parts.  Some Asian manufacturers have their ranges, but with relatively unknown brands and no discernible review history in the bike forums, I decided to forgo the marginal weight advantage and to opt for a product from an established company with a reputation for well-engineered products.

The headset that I ended up purchasing is the Prolite Ampezzo integrated headset, compatible with the industry-standard Cane Creek unit.  Bought from Chain Reaction Cycles, the cost to me was NZ$41.81.

Of some importance are the dimensions of the bearing cups.  6.5 mm deep with a 45° 1.5 mm bevel, the headset has an outer diameter of 41 mm.  The head tube, then, must be machined to fit one of these cups top and bottom.

If you are going to go to the effort of a unique build, it helps if the parts fit together properly, so  while I get the frame design and quotes sorted details such as the headset and the bottom bracket cannot be overlooked, otherwise some replacements will be needed - and the frame will always stay.


Friday, December 7, 2012

Saddle-Up the Palomino

Saddle-Up the Palomino

A bike has four contact points - where you (normally) come into direct contact with the machine.  Handlebars, two pedals, and the saddle.  Note, saddle, not seat. A seat is a flat thing that you park your butt onto.  Like a sofa.  A saddle is more of a ridge-like feature, with your legs coming down either side.  Think horses, think motorbikes, think bikes. 

 The only bikes that have seats are recumbents, those odd-looking machines that ride low with the rider in a reclined position, legs pedaling high up front.  Although 'bents may invite ridicule, the world speed record for human-powered bikes was set on a 'bent.  To quote Wikipedia, "The IHPVA hour record is 90.60 km (56.30 mi), set by Sam Whittingham on July 1, 2009. The equivalent record for an upright bicycle is 49.700 km (30.882 mi), set by Ondřej Sosenka in 2005. "

But, this project is for a regular road bike, so we are talking saddles.

The basic form of the bike saddle has changed little over the decades.  A wide rear to support your derrière, and a narrow nose that supports the base of your pelvis while your legs come down either side.

Many saddles are sprung in the rear, with varying amounts of padding.  To secure padding, a rigid shell gives the saddle shape, and a flexible surface is stretched over the padding and stapled underneath the seat.  This surface can be anything from leather, still used on Brookes saddles and high-end racing saddles, through to vinyl and plastic.

Saddles are secured to the top of the seat post by either a ring-clamp that tightens around the top of the tube, or the more modern arrangement of an arc-grip that secures the saddle by its rails, two frame-rods that give structural tensile strength to a lightweight shell, made from either nylon or carbon fibre.

The modern, light road saddles have minimal padding, the comfort coming from the light shell that flexes with the weight of the rider.  That is, instead of having compressible foam on a rigid shell, the shell itself curves to suit the rider.

Choosing the right saddle is the feature topic of many forum discussions, both online, on rides, and in magazines.  This is a consequence of the saddle being perhaps the most intimate of the contact points.  The risks of having a bad saddle choice include numb-nuts (that is, loss of sensation to your genitals, caused by compression of certain nerves and blood vessels), chafing, and pressure sores.

First off, get the width of the saddle right.  

The bottom of your pelvis is shaped like a ring. This is smaller in guys, as they don't have to push a baby through it.  The rear of the pelvic girdle (yeah, I know.  That is what it is called.) has two projects about 13 cm apart when you sit down.  These are referred to by cyclists as the "sit-bones".  These should be centred in the middle of the side pads of the saddle, so the wider apart these bones are in your butt, the wider the saddle is that should be on your bike.  if in doubt, take a look at saddles that are labelled as women's saddles.  They will typically be wider and shorter than mens' seats.

And that brings us to the numb-nuts issue.

The main nerve to your goolies runs from the base of the spine to a point in front of your anus, and then along to your genitals.  It just happens that that point between your wedding tackle and your anus happens to be the principal pressure point on the saddle, so sustained pressure will cause a temporary loss of sensation that will not enhance your sex life.  That concentrated pressure, together with the regular lateral motion from your legs will also promote the development of chafe spots and pressure sores, often caused by tension on hair follicles.

Some saddles have different cushioning materials along the prong of the saddle, and others have nothing at all - the cut-out saddles.  Personally, I prefer these to traditional saddles, as I find them more comfortable on long rides.  The challenge is finding one that works.

My saddle choice has the same (narrow) dimensions as the saddles I have been riding for the last five years.  My current saddle provides a good platform, but at times it feels as if I am sinking into padding on an inflexible shell, so my main priorities were first dimensions, followed by materials, price and weight.

A carbon shell made specifically to flex is ideal, and after considering a few options, including the Selle Italia range, Specialized Body Geometry range, and the Ritchey Biomax saddles.  The weights of the considered saddles ranged from 219 grams (Selle Italia Flite, NZ$150 from Torpedo 7), through to 325 grams (Ritchey Comp Biomax, NZ$48.85 from Ribble).  There is a distinct premium on weight, and there are many ultralight saddles with non-ultralight prices, which is fine if you are on a professional contract and the manufacturers give you their saddles to road-test for them.  But aging riders on teacher salaries cannot be so picky.

This aging rider on a teacher salary ended up buying a 280 gram Ritchey Pro Biomax saddle (microfibre surface, carbon shell, alloy rails) for NZ$92.43, from wiggle.co.uk.  This is it:

It has the same dimensions and shape as my last two saddles, although I will need to ride it for a few thousand km to confirm that it is the right saddle for me.  
It is not the lightest or cheapest, but it is at the lighter end of the scale and the price compares favourably to other saddles of similar specifications.  If you ever find that your saddle gives you problems as described above, try a different saddle. 

In addition to the cut-out style, manufacturers are experimenting with some decidedly odd-looking shapes, each designed to boost comfort, if not performance. 
if you ride with a group ask around, as other riders often have old saddles sitting in a cupboard somewhere.  I do - but from different bikes, different designs and purposes.  Just make sure that you get it right, even if it means trying a few different saddles before you find the one for you.  It is worth it.

Saturday, November 17, 2012

Stem the Flow with a Stranglehold

Stem the Flow with a Stranglehold

 
Say the word "stem", and what do you think of?  Most likely, you did not think of a short tube with bolts attached that link a bike's handlebars to the forks.  

Flowers have stems. Stem cells can grow to become any one of the many tyoes of specialised cells in your body.
You can stem the flow of water from a pipe. WIne glasses have stems (do you hold the glass or the stem?  By the stem - that is why it is there.  So that you do not leave greasy finger prints, and so the heat of your hand does not warm the wine.  Now you know!). 
And, another bit of trivia, potatoes are actually high-modified plant stems, and the eyes are vestigial leaf buds.  But, a bike?

Let's face it - most parts on a bike are named with a remarkable lack of imagination.  Handlebars are bars for your hands.  Gears are, well, gears.  Derailleurs derail.  Cranks crank, and forks are, well, forked.  You get the idea.  But, stem?  The origin goes back to the form known as the quill, which predates the modern perpendicular-
I tube unit.

One of the overlooked moving parts of a bike is the front fork unit.  The steering tube (the non-forked end) passes through the head tube (the front, near vertical part of the bike frame), and is held in place by the head set.  The challenge comes with how to attach the perpendicular handlebars to the top of the steering tube.


The classic quill stem is a single L-shaped unit that, inverted, slips into the top of the steering tube, with a tension bolt running down the centre of the stem.  When the bolt is tightened from the top of the stem is draws an oblique-cut block upwards into the base of the stem tube, tightening the fit against the inside of the steering tube.  The handlebars typically slip in to a broken-ring welded to the end of the quill, and held in place by a single closing bolt.


Although still popular with many bikes, the quill stem is mainly relegated to mountain bikes and commuters.  Road bikes tend to favour the threadless stem.  A simple tube with half-tubes welded to each end, offset from each other by 90°, one end is bolted to the top of the steering tube, and the handlebars to the other end, using half-round face plates to enclose each tube.


The beauty of this system is that it is readliy interchangeable with other stems, and can be manufactured in any length and angle.  You can also use an adjustable stem, with lockable pivots built into the stem, and telescoping sections to also adjust the length, although the adjustable stems do weigh much more than the carbon stems that are, unsurprisingly, found at the top end of the market.

Rather than buy a heavy adjustable stem, the issue becomes primarily what length.  And this is where things get interesting.

The stem holds the handlebars forward of the steering tube, so becomes an integral part of the bike's geometry.  Most people think of bike fit as being buying a bike that says Small-Medium-Large, ride it and see if it is comfortable or not.  

The further you ride, the more important it is that your bike is not only the right size, but that the adjustable parts are set up for your own unique geometry.  Seat height, seat position (how far forward or back), handlebar height (set by the riser rings beneath the stem), stem length.  Even the position of the cleats under your shoes affect how you ride.  There is no single best-fit, as different frames have subtly different tube lengths and angles.  


As far as the stem is concerned, this controls the reach - how far you have to reach forward to hold the bars.  Having a long body and short arms can be the same set-up as a short body and long arms, although the angle your body forms will be flatter with the long body option.  You could have long legs, requiring a longer down tube in the frame, but with shorter body and arms need a shorter stem.

There are websites that will calculate your ideal fit.  The site I used is 

Note the handlebar extension length.  This is the stem.
Following the detailed, and photographic instructions, my wife and I worked through a series of body measurements, and entered them into the website form, which then gave the ideal measurement ranges for three different bike set-ups, each for a different riding style.  Opting for the "Eddy Fit", not because of its name (although that is a less than subtle factor in my own psyche) but for the description of the riding style.  My recommended stem length was in the range of 10.5 to 11.1 cm. 

As with many other bike parts, there is a premium on weight and materials.  Steel is cheap and heavy, carbon is expensive and is light.  in between are the alloy stems, of different alloy grades, tube thicknesses and lengths.  The deals that I found included a budget NZ$24 for a stem weighing 160 gm, but the best deal I could find was from the eBay trader superbicycle.shop, a stem from the Uno brand.  11.0 cm long, 114 gm weight for a total of NZ$41.24.  Here it is...

Of note is that the average $:gm ratio was NZ$0.27/gm weight, although this ratio increases as the stem weight goes down, giving a unit ratio of NZ$0.36 for the uno stem.  The 160 gm stem mentioned had a ratio of NZ$0.15, indicating the relationship between weight and price.  To see this, I created a scatter plot of the weight and price data, which shows the distinctly negative relationship.  As always, you get what you pay for.

Still, pay attention to your comfort, and utilise the ease with which the threadless stems can be replaced.  If you have recurring shoulder or back pain, get pain in your hands, or even if they go numb, try swapping out the stem for one of a different length, as this has a direct control over the degree of forward lean in your riding position and the degree to which your arms and hands support your weight.


Friday, November 9, 2012

Propping Up the Bars - Get a Grip!

Propping Up the Bars - Get a Grip! The Handlebars...


Imagine, for a brief second, a bike without handlebars.  Easy enough.  Now try riding it.  it is possible, as most of us ride without a hand on the bars at some time.  The difficulty comes in control at slow speeds. Or for that matter, control at any speed.  We can ride a single-speed with a coaster brake, letting us stop, but control is marginal at the best of times.

Arch-Duke Franz Ferdinand.
His handlebar could not save him in Sarajevo.
Which is why we have handlebars.  And if you can grow a decent mustache, that can be a handlebar, too.  From the point of view of the physics of bike riding, you can manage without bars, but you have to be sitting upright, so that your body mass is supported vertically down the seat tube.  And that produces drag, so you want to get aero, by leaning forward and down, and you need the bars to support your body.

Cornering can be an issue.  Bicycles and motorbikes steer by a phenomenon known as counter-steering.  Simply, you push the bars to turn the front wheel towards the direction that you do NOT want to turn towards.  in practice, this feels like leaning down on the side you are turning into, but in reality you are pushing the front wheel the other way.  What happens next is quite interesting.  


Turns left, but which way is his front pointing?  Right.
As the bottom of the bike begins to turn, the top half (everything above the centre of gravity) continues to move forward, widening the effective arc of motion.  This causes the top half of the bike to lean over towards the outside of the curve.  As an example, you want to turn left, so you point the wheel to the right, and the bike leans to the left.  The tyre has a circular profile, with the widest wheel diameter at the apex of the profile.  By leaning the bike over, you are now rolling along the edge of the sidewall, with a small rotating wheel diameter.  This has the effect of shortening your wheelbase towards the inside of the curve, changing your direction.  As you enter the turn the wheel can straighten out, but if you need to tighten the turning arc you again push the wheel towards the other direction.

And you cannot turn like that if you do not have handlebars.

So, what bars to choose?  How long is a piece of string?  Urban commuters, mountain bikes, BMX bikes all have upright bars of different style.  Road bikes typically have the classic drop handlebars, which have been around in form or another since the period 1895-1907, when they first started to appear, with varying degrees of drop or curvature, throughout Europe and North America.  There are several forms of the drop, or anatomic, handlebars available, ranging from the classic curves of track bikes to the straighter, angled bars that are common today; I ride a pair of these, and personally find them to be more comfortable than the older, curved bars that I used to use.

You will find this bit information anywhere you choose to look; use handlebars that have an outside-edge width that matches your shoulder width.  If you ride narrower bars than your shoulders, you will always be riding cramped inwards, with ensuing discomfort.  The same goes for bars that are wider than your shoulders.  You really will not like riding mismatched bars for too long.  I am reasonably broad, and use 44 cm bars.

The next temptation is material.  Although the world seems to be moving to carbon, I am sticking with alloy.  If you crash, and I have, alloy bars will, at worst, bend.  If you come down on carbon bars they will not bend.  They will flex under the impact, but you can end up with deep cracks or wrinkles, both of which create zones of weakness.  And these fail. 
 Honestly truly, you really do not want you bars to fail.  For carbon, this is called a snap that sounds like a rifle-shot, inevitably combined with you crashing forwards onto the headset, broken shards of carbon, and a well-timed face-plant on the road.

I'm taking the alloy option.

So, the angled style of drops, 44 cm, alloy, of standard 31.7 mm bar bore.  Although I found some sharp deals on the regular websites, the sale went to an ebay trader (Meetbike), for a Deda Big Piega Road Handlebar, with these specs:

  • Width: 44cm outside to outside  
  • 31.7mm bar bore
  • 142mm drop
  • 86mm reach
  • Deda Anatomic bend
  • Material: 6061 T6 Heat Treated Alloy
The total cost to me was NZ$35.65.  Although the cost was a tad more than the Easton EA30 bars from some established stores, the Deda, at 305 gm, is 10 gm lighter than the Easton.  I could have bought bars that were even lighter, but the price differential was typically by a factor of about 10.  The Deda is light enough!

Friday, October 19, 2012

Braking the Bank - Not

Braking the Bank - Not

One would think that having a safe, secure and reliable means to stop moving would be right up there with how to get moving.  The trouble is that bikes, like many other vehicles, were created and developed by men.  Typically, the thrill is in moving, not stopping.  That is, moving fast.  Stopping has just been coincidental with the need to do other things, for example sleeping.  Hands up if you have ever dozed off while driving.  Go on, we know you have.

Lance gives a urine sample...
Cycling is a slightly different matter.  If you doze off, you fall off.  Just about everything else you can think of doing can be done while on the go.  Eating, drinking, texting, taking photos, having a leak (I have trained with one guy who rolls his shorts leg up and lets rip.  It pays to recognise his signal movements, and get clear).  Even taking a dump - there are the pro stories of the lowly domestique holding a Dixie cup under the captain's sweaty butt.  So, how can we stop without busting collar bones, getting gravel rash and the like?

We use brakes.


Take a look at the first two-wheeled vehicle, the velocipede.  No pedals or crank set, too early for that.  You sat on it and walked.  if you wanted to stop you Flintstone'd it, but of course, you would not be going terribly fast, either.

Roll forward to the ordinary cycle, or Penny Farthing to the popular name.  You ride too high to put your feet down, so, with the exception of a few spoon brake ordinaries, you brake the same way you move forward - pedal slowly, and make sure that you dismount a fraction of a second before you do actually stop. It is a long way down.

And so to the modern era.  All a brake is is a means to convert your kinetic energy into heat, and some sound.  And, if the conversion is fast enough, light.  Getting the brake pads visibly glowing is an achievement normally reserved for sports motorbikes and cars, although as soon as they get warm the pads radiate heat as infra-red light. 
Which we cannot see, although many other animals (snakes, bats and butterflies) can.

The first friction brake on a bike was the spoon brake, essentially a flat paddle that was pushed against the tyre surface.  These appeared on a few ordinaries, and still appear as home-made brakes on under-equipped peasant cycles in Asia.


Early in the twentieth century the duck brake arrived, which was the precursor to the modern rim brake.  The duck had a rigid arc with a pair of pads or rubber wheels that, when the arc was raised, were pressed against either the tyre wall or, in its later development as the rod brake, the underside of the rim.  As a simple lift-drop mechanism they were well suited to a handlebar-mounted lever with a pivot rod.  The rod brakes are still found as new issue on the ubiquitous Chinese Flying Pigeon bikes. Brakes were now controlled by hand levers without the danger of moving your hand from the grips.

Coaster brakes were invented in 1898, and are still a common feature on single-speed bikes.  These work by pedaling backwards - perfect for laying rubber on the seal.  But distinctly unsuitable for any bike with gears.

So, we are back to the evolving design of rim brakes, which are essentially advanced forms of the rod brake.  You squeeze the lever, pulling a cable which applies tension to close a pair of sprung calipers, pressing their rubber pads against the wheel rim.  Whether the are side pull, centre pull, Campy deltas, fork-mounted cantilevers or v brakes, they are all variations on the same principle - push rubber against the rim.

An aside here - disc brakes work the same way, but instead of pushing against the wheel rim itself, the pads push against two sides of a steel disc that is bolted to the rim.  These provide more secure braking than rim brakes, but are not used on road bikes owing to the extra weight and aerodynamic disadvantages, which are not typically an issue on mountain bikes that are already encumbered with double suspension and rather weighty wheels.

So, what brakes to fit to the project.  Typically brake sets are interchangeable with the shifter lever units, as they all work the same way - by cable tension.  What is of issue is the pull distance, security of action - does it stutter and grab, or give smooth, controlled modulation of the braking action, and weight.  Plus strength, so over time it is not warped or pulled apart by the repeated stress of trying to stop a rotating wheel.

There are many options, including unfamiliar brands from Asian factories. I considered a pair from a manufacturer calling itself Mr Control, the brake units also appearing under different names through eBay.  Narrowing the range down to a mere eleven models, some targeted research gave the best deals internationally for each.  The choice narrowed down to a realistic price differential between the few lightest units.  Mr Control was the lightest at 235 g, but history and reviews labelled this as an unproven quality. 
Next in line were the SRAM Force and Rival sets, at 280 and 287 grams each (front and back together), with a best price difference of NZ$40 for a saving of only 8 gm.


So, the choice was the (slightly) heavier SRAM Rival brake set, at a total cost (including shipping) of NZ$124.01 from Wiggle, in the UK.  here they are...

Wednesday, October 3, 2012

Getting Shifty in the 'Hoods...Shifter Levers

Getting Shifty in the 'Hoods...Shifter Levers


Gears are marvelous things.  You can find them in many forms and uses through the last few centuries.  A simple block and tackle, with a rope or chain running through, is a geared arrangement that allows a small effort to shift a greater load.  Really, a simple lever can be considered to be the grand-daddy of all gear systems, as the basic concept remains the same - to shift a great load with a smaller applied effort.

Rotating gears began with wooden pegged wheels, still found today in (elderly) wind and water mills.  A simple clock, with its not so simple clockwork mechanism, is a mechanism of interconnecting gears the both regulate the release of energy stored in a simple, coiled spring, and also governs the movement of at least three different hands on the clock dial, all to keep time.  Perhaps the ultimate expression of mechanical gears was the Difference Engine, designed by Charles Babbage with assistance from Ada Lovelace, the mathematically talented daughter of Lord Byron.  
Although never constructed during Babbage's lifetime, this was nothing less than a complete mechanical calculator, and working examples of his engine have been constructed in recent years, and they work exactly as intended.  of course, echoes of this were found in the Enigma code machine that was used by Germany during the Second World War, and reverse-engineered by Alan Turing's team at Bletchley Park.

With the development of the internal combustion engine, gears for vehicles became a necessity as, despite a public perception of the ICE being powerful, they have always been inadequate for the job of moving a car-sized mass with direct gearing.  The engine must be working at a rate measured in thousands of rpm, stepped down through a gear system before it has a chance of getting the vehicle moving.

Bicycles are no different.  lets face it - human legs are not the strongest items out there.  We evolved to run far, and not terribly fast, either.  Marathon and endurance runners do as sport what we evolved to do.  Take a look at any single-speed bike.  Yes, the chainring is the larger of the two ends, with the drive sprockets typically smaller, so that the rear wheel ends up performing more rotations than the cranks.  But the actual gearing is expressed as how far you travel for one crank rotation.  For a 700c wheel, the circumference is typically 2100 mm (varies depending upon the tyre geometry).  So, at the steep end of a 53-tooth crank with an 11-tooth rear sprocket, the ratio works out as 53 ÷ 11 x 2.1 = 10.1 metres.  This is how far I would travel with just one revolution of the cranks.  Impressive?  No.  That works fine when on a downward grade or in a race-ending sprint.  But you cannot push that hard routinely, unless your name is Merckx.  Last time I checked, that ain't me.

Similarly, traveling uphill the gears become much easier.  Running a 39-28 combo, my travel distance has become 39 ÷ 28 x 2.1 = 2.925 metres.  Less than a third of the top end, and on some climbs in these parts still feels too steep (before you think "use a compact", the 39-28 gives an equivalent ratio of 35:25, easier than the compact's 36-25. So there.) So, with the two extremes of the gear ratios set out, there has to be a simple way of changing gears quickly, reliably and efficiently that does not involve stopping and turning the rear wheel around, as done by the first cyclists to experiment with gears.

The derailleur changers, and the internal hub gears as well, all use a simple technique for shifting gears.  A cable.  One end of which is anchored to a lever.  Turn the lever one way and increase the tension on the cable, pulling the derailleur across, or release the cable tension and let the derailleur springs return the gear unit towards the relaxed position.  The variety comes in the range of lever designs and appearances.

The seventies classic, the Raleigh Chopper, had a stick-shift lever, made to look like a car's automatic transmission.  Still, just a lever.  For decades the standard road-bike shifter were friction-levers screwed into nuts brazed onto the frame.  Some riders still use these, and friction levers can still be purchased new.  

A forgettable design innovation of the early eighties saw these levers migrated to the top of the stem, so that the rider could use his or her thumbs to shift while riding with hands on the bar tops.  These bikes typically came with lever extensions on the brake levers, so that the brakes could operated without moving hands from the bar tops.  Perhaps the only good thing to say about the stem shifters is that you could shift gears and brake without taking your hands off the bars, as required by down-tube friction shifters.

An attempt to fix this hand-shifting issue for racers resulted in bar-end shifters, so that the rider could move the levers when riding in the drops.  These shifters are still with us, having moved address to the ends of aero-bars on time-trial and triathlon bikes.  Thumb shifters are now standard issue on mountain bikes and commuters, the urban bikes also now sporting twist-grip shifters, where the entire handgrip rotates to control cable tension.

Yet, the standard was set in 1990 when Shimano introduced the Shimano Total integration (STI) units, combining brakes and gear shifters in the one mechanism.  Campagnolo followed in 1992 with their ErgoPower shifters, and SRAM in 2005 with their Double-Tap shifters.  They all have the same operating principle - the levers move across two, perpendicular axes.  Towards the bars for braking, as usual, but also across to shift gears.  The units also have a second lever, either under and in line with the main brake lever or, as with the Shimano Sora units, a thumb-operated lever on the inside of the unit, to release tension.  Although both Shimano and Campagnolo now have electronic shift-control systems, these are a tad more expensive, as you naturally have to have the matching motor-actuated derailleur.  So, I'm sticking with the traditional cable-pullers.

Although the three systems share the basic structure and operation, they are not interchangeable between brands. The critical difference is in the pull distances.

When you move a lever to change gear it actuates a ratchet, which maintains cable tension.  The distance that the cable is pulled is matched to the movement of the derailleur across the rear sprocket or front chainrings.  Each of the three manufacturers use slightly different cable pull distances which, although slight, cannot be tolerated in a precision gearing unit.  The old friction levers were universal, as you controlled cable pull by how far you pulled the lever.  With up to ten rear sprockets, and eleven with the latest Campagnolo cassette, there is little room for movement if the chain is to move through the gears without any sideways tension which, if not properly aligned, can result in gear-jumping and chain rattle.  Simply, the shifters must be from the same manufacturer as the derailleur.

In the Shimano range, the Ultegra 6700 system is interchangeable upwards and downwards with Dura-ace and 105.  I am not spending on Dura-ace, which brings into question value for money.

A review of the bike forums online sums it up.  Spend more on Ultegra, and you get carbon levers.  In terms of function and operational efficiency, 105 is comparable to Ultegra.  Just a little heavier owing to the alloy levers.  With the lowest possible prices internationally of NZ$403 (Ultegra) and NZ$259 (105), a difference of NZ$144 for carbon levers is excessive.  So, a pair of 105 (5700) 2-10 shifters is the order of the day.

The cheapest price was from Ribble, but it was so low that they were out of stock, with no date set for resupply.  Wiggle would only match the price if Ribble had it in stock (yeah, I haggle!), which they didn't.  So the deal went to Merlin Cycles.  The complete boxed pair, complete with gear and brake cables, was sold for the grand total of NZ$282.71.  Here they are...

Styling has improved somewhat over the last few years, and this set (2012 model) would be at least equivalent to the Ultegra shifters that were available in 2007, the year of my current 105 ride, so it is a definite step up in the world.  A positive shift, you could say.